

Key Highlights
- Tree pose looks simple, but small alignment mistakes can affect your balance and comfort.
- Safe foot placement matters most, especially to protect the knee joint and standing leg.
- Good hip alignment helps you stay upright instead of leaning or twisting in the posture.
- A steady gaze, active core muscles, and grounded standing foot make balance easier.
- Relaxed arms and shoulders improve posture and reduce extra tension in the pose.
- The benefits of tree pose grow with regular practice, patience, and smart modifications.
Introduction
Tree pose benefits is one of the most familiar shapes in yoga practice, yet it often feels harder than it looks. If you wobble, grip your shoulders, or struggle with alignment, you are not alone. Small errors in tree pose can throw off your posture and make balance much less steady. The good news is that these issues are usually easy to fix. Once you understand what to adjust, the pose starts to feel stronger, safer, and more comfortable.
Understanding Tree Pose (Vrksasana) in Yoga
Tree pose, or Vrikshasana, is a classic yoga posture based on standing balance. You stand on one leg while the other foot presses into the inner thigh or inner calf. Your hands can stay at your chest or lift overhead.
This posture builds focus, improves posture, and strengthens the lower body. It also opens the hips and trains body awareness. Even though tree pose is beginner-friendly, the details matter. To do it well, you need careful alignment, steady breath, and calm attention.
Key Elements of Tree Pose Alignment
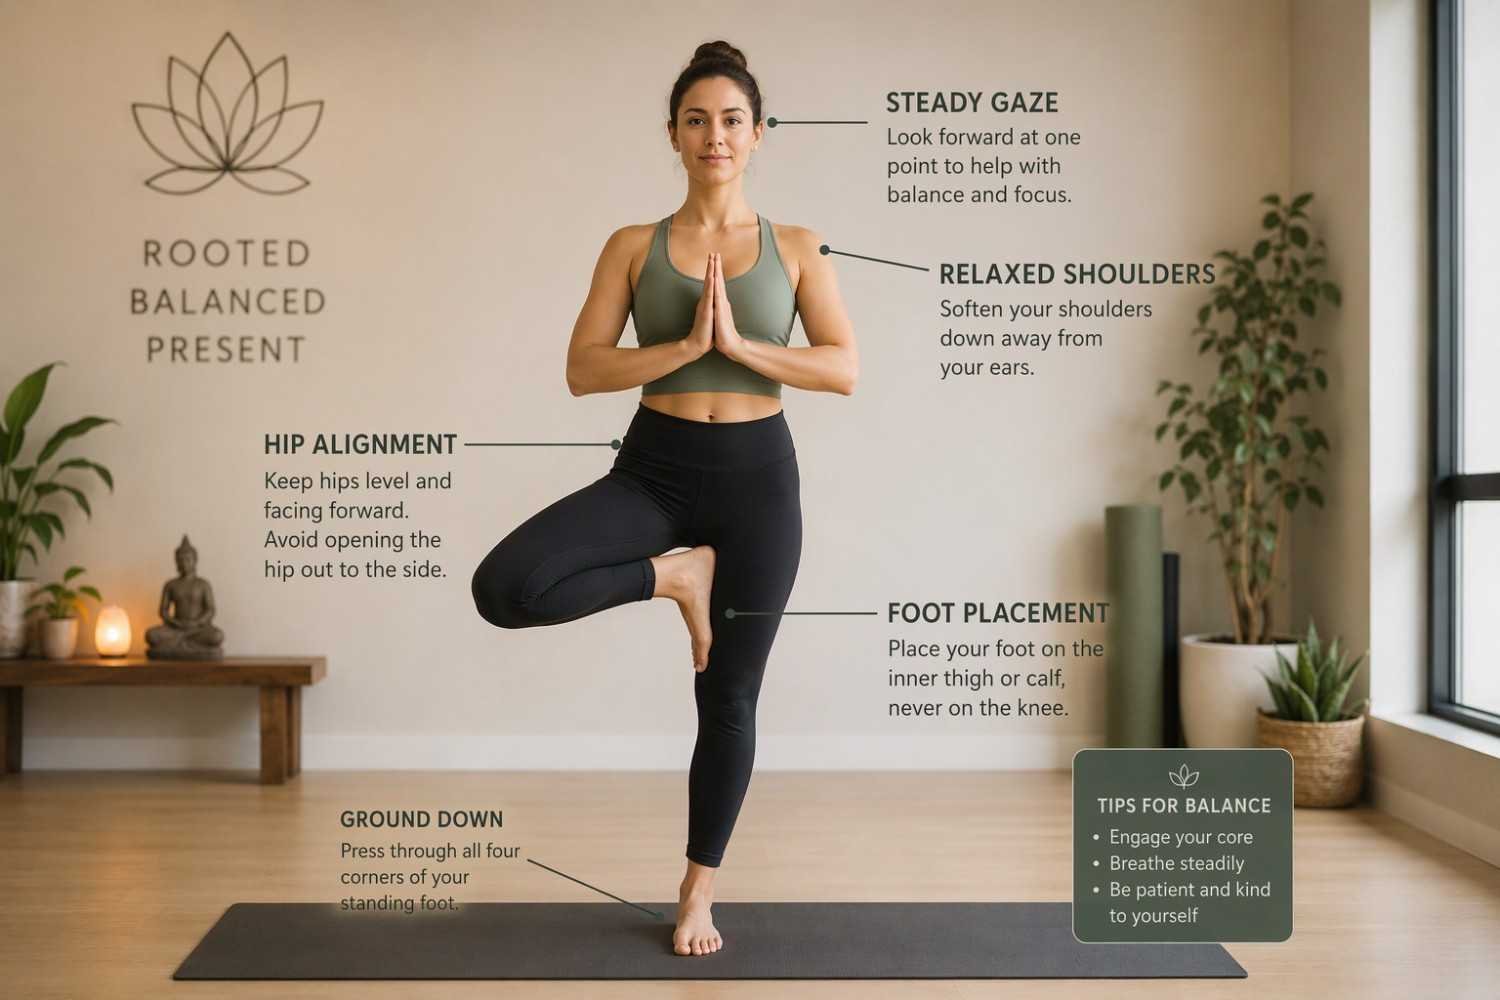
Good alignment in tree pose starts from the ground up. Your standing leg should feel active, not rigid. Keep a soft standing knee instead of locking the joint. At the same time, spread the toes and press evenly through the standing foot to create a stable base.
Next, place the lifted foot on the inner thigh or inner calf, never on the side of the knee joint. Press the foot and leg into each other. This helps proper alignment and keeps the pelvis steadier. (200 Hour Yoga Teacher Training in Rishikesh) If the foot slips, lower it and rebuild the pose.
Just as important, engage your core muscles and lengthen through the spine. Common alignment errors include a locked knee, a leaning torso, and a standing hip that drifts out. Watch for those signs. When your trunk lifts tall and your standing leg stays strong, the posture becomes more balanced and controlled.
Importance of Balance and Stability in Tree Pose
Balance in tree pose depends on more than willpower. Your standing foot must stay grounded, your breath should stay even, and your attention needs to stay clear. When any one of those pieces drops away, wobbling usually starts.
One of the easiest ways to improve balance is to use a steady gaze. Pick one still point at eye level and keep looking there. This gives your mind one job. Slow breathing also helps. When you hold your breath, the pose often becomes shakier.
Tree pose also develops proprioception, which is your sense of where your body is in space. That skill improves with regular practice. If you keep falling out, try the pose near a wall at first. With time, your standing foot, ankle, and core will learn to respond with better control.
Common Mistakes with Foot Placement in Tree Pose
Foot placement is one of the biggest trouble spots in tree pose. Many people rush the setup and place the lifted foot wherever it seems to fit. That can affect comfort, alignment, and control right away.
For a safer position, rest the sole on the inner thigh or the inner calf, but never on the knee joint. The standing foot should stay firm and evenly grounded. When foot placement is correct, the pose feels more stable and the rest of the body has a much easier job.
Risks of Placing the Foot on the Knee
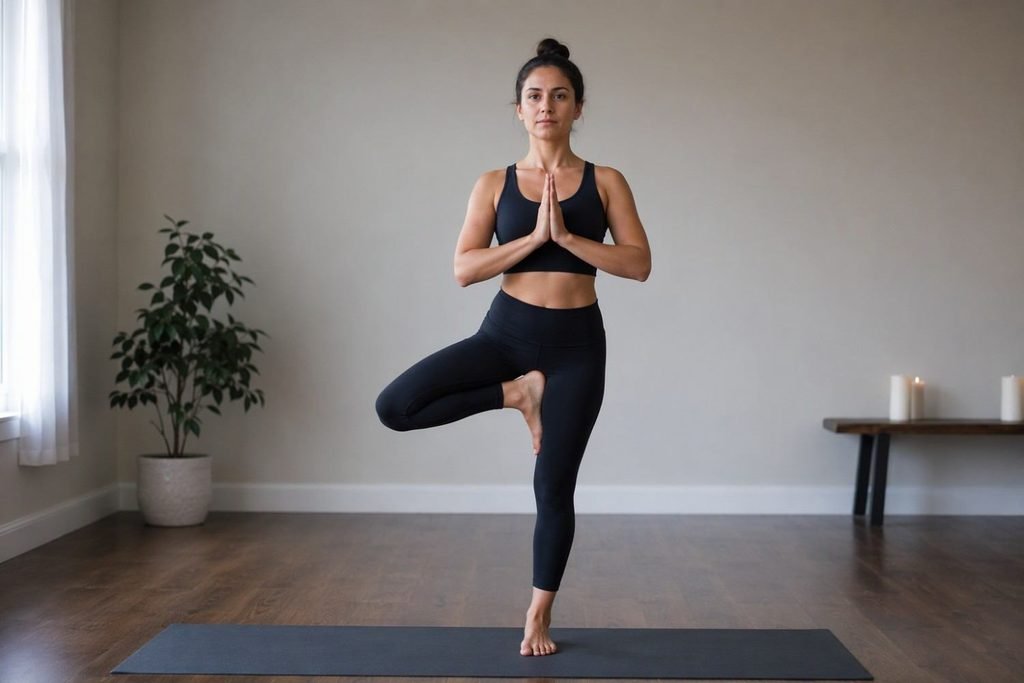
Resting your foot on the side of the knee joint is a common mistake in tree pose. It may seem like a convenient shelf, but it places sideways pressure on an area that is not meant to hold that load. That can increase the risk of injury.
Why is this foot placement a problem? The knee works best when it bends and straightens in its natural path. Pushing into the side can create strain and make balance less secure.
- It adds pressure to the knee joint from the side.
- It can increase the chance of discomfort or injury.
- It usually makes the pose less stable, not more.
If you have been doing this, do not worry. Just move the foot above the knee onto the inner thigh or below it onto the calf. That one change often improves both safety and confidence.
Optimal Positions for Safe Foot Placement
Safe foot placement gives tree pose its structure. The best options are the inner thigh or the inner calf of the standing leg. Both positions help you build proper alignment without pressing into the knee joint.
If your hips feel open and your balance is steady, the inner thigh is a strong choice. If you are newer to the pose or feel wobbly, the inner calf is often more manageable. In either case, press the foot and leg into each other gently.
- Place the foot on the inner thigh for a fuller version.
- Use the inner calf if you need more control.
- Avoid the knee area completely.
Start with the option that lets you stay tall and breathe normally. A lower placement is not lesser. It is often the smartest way to protect the ankle and knee while your standing leg gets stronger.
Preventing Ankle or Knee Injury
To help prevent ankle or knee joint strain, focus on how you use the supporting side. Your standing foot should press evenly into the mat, with the toes spread and the outer heel grounded. That creates a steadier base for balance.
Keep the standing knee soft instead of snapping it straight. A locked leg often makes you wobble more and shifts the work into the joint instead of the muscles. The ankle also works better when the leg is active but not stiff. Think strength with ease.
If you want your supporting leg to stay strong and stable in tree pose, practice shorter holds with good form. Twenty to thirty seconds per side is enough at first. Over time, regular practice strengthens the ankle, calf, and thigh while helping the pose feel safer.
Hip Alignment Errors and Solutions
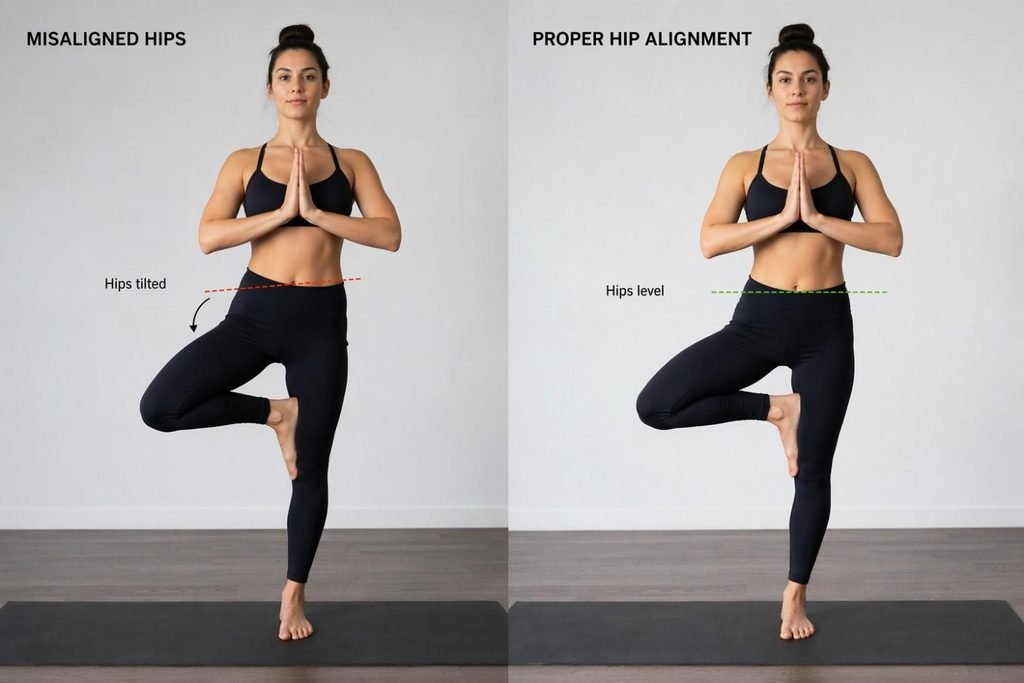
Hip alignment often decides whether tree pose feels stacked or shaky. When the pelvis tips, twists, or shifts too far to one side, your balance can disappear quickly. You may also notice your spine leaning to compensate.
The goal is to keep the pelvis organized and the hips level as much as possible. Misalignment here is common, especially when you are trying hard to lift the foot higher. The next sections break down why the hip moves and what you can do to correct it.
Why the Hip Sticks Out or Twists
When your hip sticks out in tree pose, the body is usually searching for an easier way to stay upright. Instead of stacking over the standing leg, you may push the standing hip sideways. That changes your alignment and pulls your posture off center.
Sometimes the pelvis also twists because the lifted leg presses too strongly or the foot is placed before balance is established. Then the torso leans and the spine curves instead of rising tall. Keeping the hips level can feel subtle, but it matters.
- A pushed-out standing hip bends the body sideways.
- A twisted pelvis can make the pose feel unstable.
- Reaching for height too soon often causes misalignment.
To fix it, begin with a lower foot placement and draw the standing hip inward. Think of both hip bones facing forward. When the trunk lifts and the pelvis steadies, the pose becomes much more manageable.
Steps to Correct Hip Misalignment
Correcting hip misalignment starts before the foot even lifts. First, stand tall in your standing position and settle your body weight into one foot without leaning. Then bend the other knee and choose a foot placement that does not distort the pelvis.
As you come into the pose, keep the pelvis steady and lengthen upward through the spine. If your hip flexors or groin feel tight, choose the inner calf instead of forcing the foot to the thigh. That gives you more room to stay upright.
- Shift weight slowly before lifting the foot.
- Choose a lower placement if the pelvis starts to twist.
- Lift through the torso instead of pushing the hip outward.
A wall can also help. Light support lets you feel where the pelvis should be without worrying about falling. That makes it easier to build better alignment and repeat it in regular practice.
Engaging the Hips for Better Balance
Strong hip support can make tree pose feel much steadier. The hip abductors of the standing leg help you stay upright over your base. When they do their job, the torso does not have to sway as much to keep you from tipping.
Try thinking of the standing leg as the trunk of a tree. It should feel active from the foot up through the hip. Pressing the lifted foot gently into the leg also helps create a connected, stable shape. This adds support without extra gripping.
If you want better balance and fewer falls out of the pose, bring attention to the side of the standing hip. Keep the torso lifted, breathe smoothly, and avoid rushing. Small, steady engagement works better than force. With regular practice, those hip muscles become more responsive and supportive.
Arm and Shoulder Mistakes in Tree Pose
Many people focus so much on the legs in tree pose that they forget about the upper body. Then the arms stiffen, the shoulders creep upward, and the posture starts to feel tense instead of calm.
Your arms can stay at the heart or reach overhead, but neither option should create shoulder pain. The upper body should support balance, not fight it. If your shoulders feel tight or your neck shortens, a few simple changes can make the pose feel lighter and easier to hold.
Avoiding Shoulder Tension
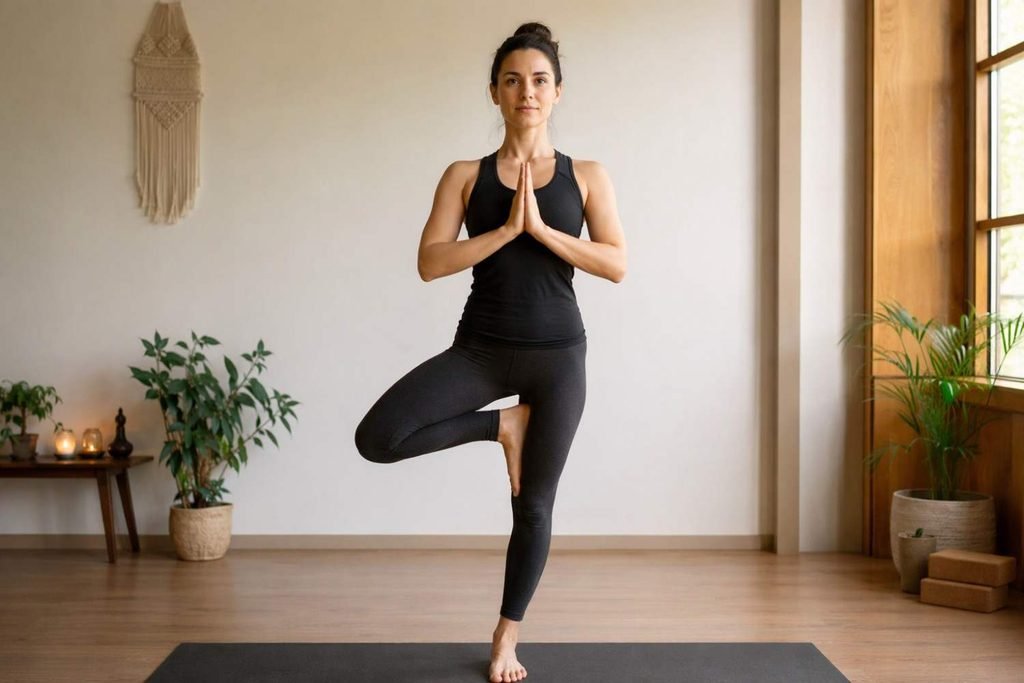
Shoulder tension often shows up when you try too hard to look steady. You may lift the arms overhead, then grip through the neck and pull the shoulders toward the ears. That effort can interfere with relaxation and distract from the pose.
A better approach is to let the shoulders stay broad and low while the spine grows taller. If overhead arms create shoulder pain or stiffness, keep your palms together at the chest. That is still full tree pose. It simply gives your upper body less to manage.
Check your posture every few breaths. Can you soften the jaw? Can the shoulders move away from the ears? When the upper body is calm, balance usually improves. Good arm alignment is not about forcing a dramatic shape. It is about choosing a position that lets you breathe and stay comfortable.
Guidelines for Proper Arm Placement
Arm placement in tree pose should match your current standing balance. If you feel steady, you can raise the arms overhead. If balance is shaky, keeping the hands at the heart often makes the posture easier to organize.
The key is to lift without hardening the upper body. Your arms should support posture, not pull you off center. Reach up only as far as you can without arching the ribs or shrinking the neck. There is no need to chase a bigger shape.
- Keep palms at the chest for a grounded option.
- Reach arms overhead only if shoulders stay relaxed.
- Spread the arms wide if that feels more natural and balanced.
Choose the version that helps you stay tall and breathe deeply. Good arm placement is the one that works with your body, not against it. That creates a cleaner posture and a calmer experience.
How to Maintain Relaxed Shoulders
Relaxed shoulders begin with awareness. Once you are in tree pose, notice whether the shoulders have started to climb. This often happens without you realizing it, especially when you are concentrating hard on balance.
Take a few deep breaths and let each exhale soften the upper body. That simple reset can improve posture right away. Instead of holding tension in the neck, let the collarbones feel wide and the arms feel supported by the trunk.
It also helps to reduce effort where you do not need it. You do not have to squeeze your hands or grip through your jaw. Tree pose is a balance challenge, but it should still include relaxation. When the shoulders stay easy and the breath stays smooth, the whole pose feels more stable and less tiring.
Stability Issues with the Supporting Leg
If tree pose feels unstable, the supporting side is often the reason. Your standing leg provides the support for everything above it, so weakness or poor alignment there can lead to wobbling fast.
That does not mean you need extreme strength. You need the right kind of strength, plus smart positioning. A standing leg that is active but not locked helps reduce joint pain and improves control. Let’s look at how to strengthen that base and avoid the alignment habits that make balancing harder.
Strengthening and Activating the Supporting Leg
To keep your supporting side strong in tree pose, start by waking up the standing leg before you lift the other foot. Feel the foot spread on the mat. Then draw energy upward through the ankle, calf, thigh, and hip. This creates physical stability from the ground up.
Strength here is not about bracing hard. It is about steady muscular support. A tiny softness in the knee helps the leg muscles work while protecting the joint. When the standing leg is active, your posture becomes taller and more controlled.
Short holds are useful for building strength without losing form. Hold for 20 to 30 seconds, step down, and repeat on both sides. Over time, the ankle, quadriceps, hamstrings, and calves of the standing leg work more efficiently. That makes tree pose feel less like a struggle and more like a skill.
Common Alignment Mistakes for the Standing Leg
Yes, there are common alignment errors in tree pose, and many happen in the standing leg. The most frequent one is locking the standing knee. That usually makes the body wobble more and shifts strain into the joint instead of the muscles.
Another issue is letting the standing hip drift outward while the torso leans in the opposite direction. This misalignment can make the pose feel twisted and unstable. Some people also collapse through the foot instead of pressing evenly through it. Then the whole base becomes less reliable.
Watch for these signs as you hold the pose. Is the standing knee rigid? Is the leg passive? Is the body leaning sideways? Correcting these patterns often improves balance right away. The goal is a standing leg that feels alive, centered, and supportive without becoming stiff or strained.
Keeping Your Base Strong and Steady
A strong base is the foundation of tree pose. If the standing foot is uneven or the body weight drifts too far forward or back, balance gets much harder. Start by feeling the whole foot connect to the floor.
Press through the standing foot with awareness, especially through the outer heel. That can help keep the ankle steady and support better posture through the entire body. Think rooted downward so you can rise upward. A stable base gives your torso and arms something solid to build on.
- Spread the toes and press evenly into the mat.
- Keep body weight centered over the standing foot.
- Ground through the outer heel for more steadiness.
If you still fall out often, use a wall while you train the base. Once the foot and ankle learn how to organize, balance becomes much more reliable and less frustrating.
Essential Tips for Beginners to Avoid Tree Pose Mistakes
Beginners often assume tree pose is only about balance, but it is really about setup, attention, and patience. If you try to force the shape too quickly, mistakes usually show up in the foot, hips, or shoulders.
A smart start includes strong focus, simple modifications, and shorter holds. Many teachers in yoga teacher training spend time correcting these basics because they matter so much. The next two sections cover practical ways for beginners to reduce wobbling and adapt the pose safely from day one.
Building Focus and Preventing Wobbling
Wobbling in tree pose is normal, especially when you are new. It often happens when your eyes wander or your thoughts drift. The fastest way to rebuild standing balance is to return to one simple anchor: your steady gaze.
Pick a point in front of you that does not move. Then breathe slowly and feel your core strength support the spine. If you lose focus or start to waver, step down and reset. That is part of practice, not failure.
- Fix your eyes on one still point at eye level.
- Keep your breath smooth instead of holding it.
- Step out and begin again if balance breaks down.
A calm reset works better than trying to fight through a shaky pose. Each time you come back in with clear focus, you train both the body and the mind. That is how tree pose becomes more stable over time.
Progressions and Modifications for New Yogis
If your hips feel tight or balance feels uncertain, modifications are a smart choice. You do not need the full version right away. Safe progressions let you build skill without straining the joints or forcing the shape.
Start with the lifted foot lower on the leg, or keep the toes touching the floor near the ankle. A wall can give support while you learn where the pose should feel steady. Some people also benefit from props if the body needs extra feedback.
- Practice near a wall for confidence and safety.
- Keep the foot at the ankle or inner calf to begin.
- Use a yoga block for support if needed.
These modifications are especially helpful for tight hips. With regular practice, many new yogis notice better balance, more comfort, and easier alignment. The goal is progress you can repeat, not a pose you can barely hold once.
Benefits of Tree Pose (Vrksasana)
The benefits of tree pose build slowly but clearly with regular practice. This asana helps improve balance by training the foot, ankle, and standing leg to respond to small shifts. It also strengthens the calves, thighs, and other key muscle groups that support stability. Because you must stay upright, the pose also encourages better posture and gentle activation of the core muscles.
There is a mental side too. Tree pose sharpens concentration because your attention stays on breath, alignment, and one fixed point. Many people notice improved mental clarity and a calmer mood after even short holds. The pose can also open the hips and inner thighs, increase body awareness, and create a grounded feeling that supports both movement and stillness.
Step-by-Step Instructions for Tree Pose
Start in mountain pose with your feet together and arms by your sides. Spread your toes and stand tall. Shift your body weight into one foot, keeping that knee soft. Bend the other leg and place the sole of the foot on the inner thigh or calf, never on the knee joint. Press the foot and leg gently into each other, lift through the spine, and choose your arm position.
Keep your gaze on one still point and breathe slowly for 20 to 30 seconds before switching sides. These simple instructions help the asana feel organized and safe.
| Step | Action | Helpful Tip |
|---|---|---|
| 1 | Begin in mountain pose | Stand tall with even weight through both feet |
| 2 | Shift onto one foot | Keep the standing knee soft, not locked |
| 3 | Bend the opposite leg | Move slowly and stay upright |
| 4 | Place foot on inner thigh or calf | Never press into the knee joint |
| 5 | Bring hands to heart or overhead | Keep shoulders relaxed |
| 6 | Fix your gaze and breathe | Hold 20 to 30 seconds |
| 7 | Release and change sides | Pause in standing before repeating |
Variations and Modifications of Tree Pose
Tree pose has several useful variations and modifications, which is one reason it works well for different levels. If balancing is difficult, place the lifted foot at the ankle and keep the toes on the floor. You can also practice with one hand on a wall. These changes help you learn the shape without losing alignment or confidence.
As balance improves, try placing the foot on the inner calf or inner thigh. Your hands can stay at the heart, lift overhead, or open wide like branches. Some people use props for comfort, such as wall support or a yoga block when needed. Among standing yoga poses, tree pose is easy to adapt. That makes it helpful for beginners, people with tight hips, and anyone rebuilding stability.
Risks and Precautions of Practicing Tree Pose
Tree pose is generally safe, but it does come with a few risks and precautions. Use caution if you have recent injuries in the leg, hip, knee, or ankle. The pose may also be difficult if you experience severe dizziness, vertigo, or major balance issues. In those cases, wall support is a wise choice. If there is joint pain, lower the foot placement or skip the pose until the area feels better.
Pregnant practitioners may also need extra support, especially later on. A wall can help reduce the chance of overbalancing. If blood pressure is uncontrolled, keep the hands at the chest and do not hold the breath. People with eye conditions should also avoid straining. In all cases, comfort matters more than appearance. If the pose creates pain, step out and adjust.
Preparatory Poses to Improve Tree Pose Success
A few simple preparatory poses can make tree pose feel more accessible. Since the posture asks for balance, hip opening, and leg strength, it helps to warm up those areas first. Standing evenly in mountain pose is a strong place to begin because it teaches you how to organize your posture before shifting onto one leg.
It also helps to prepare the hip flexors, groin, calves, and quadriceps with gentle movement before trying to balance. Tree pose depends on physical strength in the standing leg and enough openness in the lifted leg to avoid twisting the pelvis. If you go in cold, the shape often feels much harder. A short warm-up for the lower body can improve comfort, alignment, and control.
Counter Poses to Relieve and Balance After Tree Pose
After tree pose, a simple reset can help your body feel even again. Return to a neutral standing shape such as mountain pose and take a slow breath between sides or after both sides. This gives the feet, hips, and lower back a moment to settle.
Counter poses do not need to be complex. The main goal is relaxation and balance after the work of standing on one leg. A calm standing pause, gentle shaking out of the legs, or an easy posture that allows the spine to feel tall can all help. In yoga, these small transitions matter. They reduce leftover tension and make the practice feel smoother and more comfortable.
Tree Pose for Sedentary Lifestyles
If you spend much of the day sitting, tree pose can be a useful addition to your daily routine. Long hours in a chair often reduce awareness in the feet, hips, and lower body. This pose brings attention back to your standing position and asks those areas to work together again.
You do not need a full class to benefit. You can incorporate tree pose into a short break during the day, as long as you have a stable surface nearby. The pose helps wake up posture, balance, and body awareness while gently challenging the legs and core. For sedentary people, even brief regular practice can support steadier movement and better connection to the lower body.
Symbolism and Mindfulness Practices in Tree Pose
Tree pose carries clear symbolism. The standing leg acts like the trunk, the foot roots into the ground, and the arms can rise like branches. This image makes the pose more than a balance drill. It becomes a reminder of rootedness, growth, and resilience.
That symbolism also supports mindfulness. When you hold the pose with a steady gaze and smooth breath, the mind has less room to scatter. Many people use tree pose as a bridge into meditation because it combines focus with stillness. You are not trying to freeze. You are learning to stay calm through small movements and corrections. That kind of attention can carry off the mat into daily life.
Tree Pose Flows—Sequencing Mistake Prevention
In a yoga flow, tree pose can feel harder because you enter it from movement instead of stillness. That is where sequencing matters. If you rush in without finding your standing foot first, misalignment often follows. The pelvis may twist, the knee may lock, or the gaze may wander.
To prevent that, pause for a moment before lifting the foot. Even in a flowing class, tree pose works best when coordination leads the movement. Set the standing leg, choose your foot placement, then lift through the spine. Good sequencing does not slow your yoga flow in a bad way. It gives the pose enough structure to feel stable, clean, and safe from the start.
Conclusion
In conclusion, mastering Tree Pose (Vrksasana) is not just about achieving a perfect stance; it’s about cultivating balance, stability, and mindfulness in your practice. By understanding and correcting common mistakes—such as improper foot placement, hip misalignment, and shoulder tension—you can enhance your yoga experience while minimizing the risk of injury. Remember, each pose is a journey towards self-awareness and inner peace. As you continue to refine your Tree Pose, embrace the process and enjoy the benefits it brings to your mind and body. If you’re looking for personalized guidance to improve your practice, don’t hesitate to reach out and get a free consultation. Your path to a stronger, more balanced yoga practice starts now!
Frequently Asked Questions
No. In tree pose, resting the foot on the knee joint is poor foot placement and can increase injury risk. For better alignment, place the foot on the inner thigh or inner calf instead. That helps protect the knee joint and makes balancing more stable.
If you lose balance, step down calmly and reset. In yoga, that is part of learning. Re-ground the standing leg, choose a steady gaze, and rebuild the pose slowly. Better focus and smooth breathing usually help you feel steadier on the next try.
Yes. Safe modifications for tight hips include placing the foot lower on the leg, keeping the toes on the floor, or using wall support for comfort. Some people also use props such as a yoga block. Choose the version that lets you stay upright and relaxed.
The most common tree pose mistakes include poor foot placement, especially on the knee, locking the standing leg, and losing hip alignment. Many people also lean the posture sideways, hold the breath, or tense the shoulders. Small alignment corrections usually make the pose feel much better.
Improve balance by grounding the standing foot, fixing your eyes on a steady gaze, and breathing slowly. Strong focus and gentle core strength help keep the body organized. If you still fall out, practice near a wall until the pose feels steadier and more familiar.
For safe foot placement, put the sole on the inner thigh or inner calf, not on the knee joint. This supports better alignment and helps protect the ankle and knee. Choose the height that lets you stay steady without twisting the pelvis or forcing the leg.
Your hip may stick out when the body tries to compensate for weak balance or a foot position that is too high. To fix this misalignment, steady the pelvis, draw the standing leg under you, and choose a lower foot placement so the posture stays upright.
It is a mistake. In tree pose, pressing the foot into the knee joint can disturb alignment and raise the chance of injury. A safer foot placement is above the knee on the inner thigh or below it on the calf, where the leg can support pressure better.
Keep the arms in a position you can hold without strain, either at the chest or overhead. Let the shoulders stay relaxed and away from the ears. Good alignment supports posture and relaxation, while gripping through the neck usually makes tree pose harder to hold.
For beginners, the best tips are to use wall support, keep the foot off the knee, and choose a lower placement if needed. Focus on alignment before height. A steady gaze, soft standing knee, and patient balance practice will help tree pose feel safer and more manageable.